Showing posts with label tutorial. Show all posts

Tuesday, March 7, 2017

Recipe for Making Strawberry Jam and Canning the Yummy Goodness


Hello everyone and welcome.  I will be teaching a class at Wine and Cake Hobbies tonight March 7, 2017 in Norfolk Virginia. I am making this post to help the students or anyone else along the way.
The finished pint jars for my families use only.
 
I have been canning since I was a girl with my grandma Grace who is now in her 90's.
Although I didn't quit know why or what I was doing then I just remember standing at the sink and stove with her, and her telling me over and over you will hear a "ping" when the jars start sealing. I also loved eating everything she canned. My favorite was pear preserves......oh my!!! I asked for that every time and Welch's Grape Juice when I was at her house. To start with the basics of jar preparations please see this post
this will help to prepare your jars for canning. I use Ball canning jars most of the time as we buy a pallet full at a time. The Ball website is wonderful and has great recipes and instruction.
 
 
Here I am going through the strawberries to see if there are any that aren't in great shape such as a moldy one of really yucky one (you will know)

Wash them well moving them around to get all the strawberries and allow to drain
Too much water on strawberries and cause them to water downed tasting so try not to soak them, I have had ones that had so much sand and dirt on them I had to resort to that but do so briefly.
 
 
Let me also remind you to always wear some kind of covering on your head and an apron. I just love my Grateful Dead one my mom got me.....Thanks MOM!


Begin by capping the strawberries I use a tool I have had for many years and you can still find them on Ebay or other sites search from strawberry huller, strawberry capper, or even tomato huller.
Once capped you will need to use a bowl of a 13x9 dish to smash the strawberries with a potato smasher. You don't have to puree them just create juice and break them down some. I like mine "chunky"
 
 
You can see I don't completely pulp them
 
More smashing of the strawberries
 
Here you want to have 5 cups of mashed strawberries usually as reference its takes about 8 cups of whole strawberries to make the 5 cups of mashed berries. I always have so many that when its strawberry time I could can jam until I had 100's of jars so I always have more than enough.
 
Have your seven cups of sugar already measured out so once your strawberries are boiling you can have that ready to pour in the pot when its time.
 
Begin warming the strawberries on the stove top
add in your pectin (I use pectin in bulk) but whatever pectin you use read the instructions some pectin's are added at different times and have different directions, SO PLEASE READ THE INSTRUCTIONS of the PECTIN YOU are Using!!
 
 
Add three tablespoons of lemon juice
add your pectin I use one box of pectin
 
mix together the pectin and the lemon juice and begin to bring to a boil once you have a boil that cant be stirred down add your sugar
 
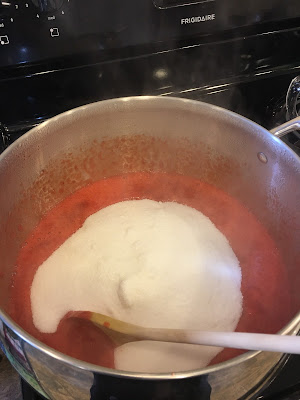
Add sugar in (*the seven cups already measured out) into the pot, bring to a full rolling boil that cant be stirred down and once you are there set your timer for one full minute. Then your jam is done.
 
Some don't want to use pectin and if that is the case you can carry your jam to a temp of 220 degrees Fahrenheit. This is only if you are not adding the pectin. Strawberries are very low in pectin and the older they get the less pectin there is.
 
These are the flats and rings in water that is approx. 180 degrees you don't need to boil them, just bring them to a temp of approx. 180 degrees and then keep them around that temp until ready to use.
 
Now you can skim off any white foam that has occurred while stirring I usually use a rubber spatula that is high temp safe and NSF. The canning funnel and the ladle can be purchased thru Ball
 or look at your local canning supply store.
You can begin now spooning in the jam with your ladle and your canning funnel. If you note the clear spatula in the jar that is to remove air bubbles, if you don't have one of these you can use a long knife such as a cake icing spreader that is narrow. I have that one for many years. Ball has a green one now to purchase.
Here I am wiping the rim of the jars with very hot water to insure there is no drippings and anything on the lid to keep the flats from sealing.
 
 
Place your flats and rings on the wiped jars and tighten as you would normally
 
Place the jars in the warmed waterbath canner and once all jars are in make sure the water comes 1" above the jar lids. Begin to increase the temperature and once it comes to a rolling boil begin timing for 10 minutes.

 
Once it boils I turn the stovetop down some and place the lid on the pot and vent a little to make sure the water is always boiling. Time for 10 minutes and once the timer is up time again for 5 minutes then remove the jars from the canner and place on a dry towel on the counter top. Allow them to cool on the counter until completely cooled. They will begin sealing some right away and others can take longer. If it does not seal you can use right way or try to water bath again. I usually have them all seal but every once in awhile there is always one that doesn't, we usually just eat that one. My boys don't mind. LOL!
Finished!!

 
Me making the jam.
 
Recipe
8 cups of whole strawberries
mashed to make 5 cups
1 box of pectin see above foe instructions
3 Tablespoons of lemon juice
7 cups of sugar
see above for directions.


post signature 

Wednesday, November 27, 2013

Vegan Peanut Butter Fudge

VEGAN Peanut Butter fudge........yum!!!
I managed to pull this off with huge success! I took my favorite fudge recipe found HERE
and turned it into vegan peanut butter fudge.
Which I was in the making of collecting supplies for this every since I found that they did make a "marshmallow crème" for vegans ricemellow.
Called Suzanne's Ricemellow crème.
Which can be found at VeganStore.com
also at Whole Foods Market and I also found it at Amazon
I was like yay!!!! It is a whole lot cheaper at Whole Foods Market if you are lucky to near one.
We live over an hour away one way just to Whole Foods Market so I do order online if I am not going in the near future.
 

I still haven't found a Vegan evaporated milk so I found this info from Myrecipes.com
on a substitute for evaporated milk HERE so I took 2 cups of almond milk from Diamond
I used the Original 30 calorie almond milk because it was what I had at home but any of the Diamond almond milks would work except the chocolate unless that's what you want to use. I just wouldn't for this.
 
Simmer on low-med heat until it evaporates to 1 cup this took about 30 minutes.
 
I sprayed my 13x9 baking dish with Coconut Spray oil which I got at Harris Teeter or also they sell at Amazon, and I do think I have seen it Wal-Mart.
 
When using this follow the directions on the can.
 
 I used for the butter Earth Balance Organic buttery spread now I bought this at Wal-Mart which I was so surprised to see at out Wal-Mart. There is very little vegan products in our Wal-Mart. So it thrilled me to no end.... #thelittlethings
 
which Wegmens has if you are lucky enough to live by...which we are not but when we go up to the DC area we purchase lots of Wegmens products. Also Amazon has and so does Veganstore.com
 
Now lets mix the ingredients you gathered
In a large pot mix together the vegan almond milk (see above), 3 cups of sugar, and the butter (see above)
 
Take your candy thermometer I use a Wilton one continue to stir the ingredients until they reach 234 degrees or a soft ball on the candy thermometer
 
On my other post I have complete pictures if you need more steps
 
Now add the peanut butter 1 1/2 cups I use the Earth Balance the crunchy peanut butter kind 
also add the 1 tsp. vanilla I use this one any will work
Add the Suzanne's Ricemellow crème (see above) now 
Stir it all together and spread in the 13x9 baking dish
 
Done!
 
 
 VEGAN Peanut Butter Fantasy Fudge
3 cups of sugar
3/4 cup of butter use Earth Balance Buttery spread (see above)
3/4 cup of evaporated Almond Milk (see above)
1 1/2 cup of peanut butter I use chunky but creamy is fine too by Earth Balance
1 cup of Suzanne's RiceMellow Creme
1 tsp. vanilla
Spray a 13x9 pan with Coconut Spray (see above) , Bring sugar, butter, and milk to full rolling boil in large saucepan on medium-high heat, stirring constantly. Boil until candy thermometer reaches 234 degrees . Softball stage. Remove from heat and stir in ricemellow creme and vanilla and peanut butter. Pour into prepared pan. Now this fudge is a little different than the regular fudge, but oh soooo good!!!
YUM!
I was so happy to finally be able to make my favorite recipe again #vegan
HAPPY THANKSGIVING!!!!!
I am so thankful for you!
Enjoy your holiday and stay safe!


post signature 

Wednesday, November 13, 2013

Tutorial for Wire Wrapped Charms, Shells, Sea Glass, Rocks with Beads and hanging charms, A DIY Wire Wrapping.

Last year I did a workshop with the Tidewater Artist Group where I taught how to make these easy fab wire charms for the summer, or anytime. See link HERE also you can see other ones I have done at other times...just more pics HERE and again HERE they are really nice big pics.
 
So before the workshop I created this fabulous tutorial handout for the group. I wanted to share with you finally.....I started off with supplies.
SUPPLIES
-Wire Cutters, Round nose pliers, flat nose pliers, chain nose pliers (these can be purchase at AC Moore, Michaels, or Any jewelry supply place. I originally bought all mine from http://www.ornamentea.com/
Last year I was lucky enough to get a new set at BeadFest I bought the Tronex from Beaducation they had a booth at BeadFest.
If you have never done this before start off with the least expensive set its all you will need for this.
-20 Gauge wire silver (you can use sterling once you get the hang of it but just start off with the inexpensive 20 g craft wire...you can use gold, copper, or even colors if you like. I use Artistic Wire when I use the color wire. The wire can be purchased at the jewelry supply stores, or the chain craft stores.
 
-Small e-beads glass ones or any kind of beads that fit on your wire, test them first.
-Charms if you like I use several charm shops on Etsy like http://www.etsy.com/shop/winecharms
 
-Any kind of small pebbles, rocks, shells, sea glass, corks, cabochons
-file such as a jewelers file or even a fingernail file, or even one you have in the garage
-Ruler
Start with the charm of choice and gather your tools
 
measure your charm then round up to the next number (so if its 1 1/2 inch charm round it up to 2)
then the number by five to give you 10...so you will need approx. 10 inches of wire. Cut two 10 inches of wire from the wire of choice. Using your wire cutters. Then put both pieces of wire in your index finger and bend over it should look like this...see pic below
Now using your other hand twist one side of the wire then using your tip of your finger or the glass, cork etc. as a template twist the other side of the wire.
 
It should look like this now. If you need to open the space up with your flat nose pliers. Now insert the charm of choice whether it is the cork, glass, shell, etc..
 
here the charm is sitting nice in the opening
 
Now take the wire and bring it up, bring one piece of the wire to the front or the charm and the other wire to the back, do this on both sides. Twisting again.
 
it will begin to look like this, this is where you can add charms, beads, etc.
Continue twisting from front to back until you reach the top of your charm now using your round nose pliers bring the wire up and around the see the pic. Then wrap the rest of the wire around the neck of the charm...or get creative and add circles, etc.

Cut the extra wire off and now file smooth you don't want any rough spots on the wire. If you are using copper cored wire be careful when filing or you will take the silver to copper. Same goes with the colored wires. If you need to flatten some of the wire you can use the flat nose pliers now.
this is where you can make bends and grooves in the wire adding shape and also tightening up the wire. It also adds to the look.
 
I recommend a lot of books by artist on wire wraps that are very helpful, in fact I own these:
1. Making Wire & Bead Jewelry by Janice Berkebile and Tracey Stanely which I have met both and are wonderful people, I even have had a class with Tracey who I adore!


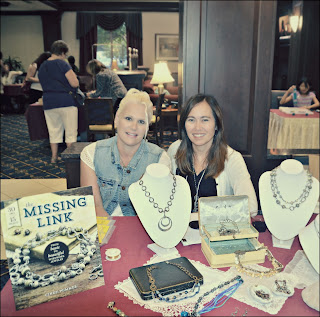
 4. The Missing Link: From Basic to Beautiful Wirework Jewelry by Cindy Wimmer
now Cindy's book just came out this September which I had her sign at ArtBliss

 I have known Cindy for almost five years now and she is the sweetest most creative person you could ever meet!!! Cindy is the BEST! Her new book is totally awesome!! A must have for any wire work jewelry artist.
Here is Cindy Wimmer and I at ArtBliss
 
Cindy Wimmer signing my copy of her book
 
I love this one of Cindy Wimmer signing the books I put this one on Instagram  (see my link on side of blog) that night at ArtBliss.
 
Also wanted to share a few pics of the grand babies and the boys.....
 
Abigail and Cooper painting up in our spare room/part of the studio
 
Skylar edited this on my IPhone
 
Dusty catching a fish. He loves to fish.
 
 
The boys recently had spirit week at school and this day was Rock N' Roll T-shirt day.
Coop is really jamming with his air guitar.
Hope you enjoyed the post today.
Have a great week!  


post signature
Related Posts Plugin for WordPress, Blogger...